
How To Become A Video Publisher & Grow Your Website

Get helpful updates in your inbox
How To Become A Video Publisher & Grow Your Website
We’ve talked about the importance of video for your Web site, both from the perspective of catching your visitors attention and for improving your search ranking. Let’s go a bit more hands-on with the actual specifics of how to create a pro-quality video, from gear to lighting techniques, and become a first-class video publisher.

The good news is that video recording and editing tools have are better and more easy to work with than at any time in history, and you don’t need much more than a good, modern smartphone or laptop to get started! In fact, there are plenty of people who are using their iPhone, Galaxy S8 or similar to not just record and edit video content, but to go live on Facebook or Periscope/Twitter.
Below, I’ll share some secrets that publishers are using to grow their brand, visitors, and digital revenue using video.
Gear for video publishers
I did mention above that some premium publishers are using smartphones and other mobile devices as a part of their video publishing strategy, it’s safe to say that, you will likely need more than this long-term if you want to become a more in-depth video publisher.
This isn’t to say that investing in gear isn’t going to make things look and sound better. In fact, your smartest investment if you want to get into video, is to buy an external microphone. I prefer wired, clip-on lavaliere microphones and my current favorite is a $29 Audio-Technica mic that records in stereo and works great with my HD camera.
In fact, let’s start with my most recent video so you can see and hear what I’m talking about in this article:
We’ll get back to my production environment, but if you look closely, you’ll see the $29 mic is clipped to my shirt and you can hear, the sound is really superb, capturing the deep resonant pitch of my voice.
If you’re using a smartphone for video recording, there are some really nice external microphones that are iPhone / Android compatible too, notably from companies like Rode and Sennheiser, whether you want one that sits on the edge of your phone or a wired – or wireless – unit that you can clip somewhere on your body.

Boom microphones held by someone else and floating over your head, just off camera? That’s vast overkill if you’re not moving into a high-end production world, plus you need a sound person to hold it. Too much work.
Making a quality video
The next step is to have your camera be super-stable. No shaky cam, please, unless you’re filming the sequel to Cloverfield and even then, the shaky camera thing can be overdone after just a few seconds. If that’s all you have, well, so be it, but you can invest in even a $10 mini-tripod that’ll work great for your smartphone or tablet, and go up to a few hundred dollars or more for a pro-grade tripod.

After trying quite a few, I settled on one that’s super strong, very stable even in tough weather conditions (important if you shoot outdoors) and has a nice head unit that makes it easy to mount a camera and quickly position and level it.
A “head unit” is what sits on the top of a tripod and actually connects with your camera or another device. Whatever you choose, even the cheapest tripod is going to be better than just tilting your camera on a trashcan or stack of books and hoping it doesn’t slip while you’re recording.
Lighting is often underrated
When I first started recording commercial video, I had no idea about how to do much of anything and learned as I went along. Sometimes with disastrous results, like when I recorded a video where I was sitting on my couch with a bright, sunny backyard behind me.
You can imagine what happened, it ended up with just a silhouette of me and looked like I was in the witness protection program. Many people get the lighting wrong, though, so it’s smart to spend some time and think about light sources and reflective sources.
I like to have at least two light sources so I can either eliminate or minimize shadows behind me. Since we all tend to move as we talk, your shadow can end up being quite distracting! Also, a handy tip: If you have an oily face, the oils on your face can “gleam” too, which isn’t entirely attractive on camera.
Wash your face before you record. In fact, try to ensure you wear solid colors, not patterns, as they can look really weird on camera and some weaves can produce what’s called a moire pattern, which is all people will see in your video, not you at all.
Here’s my recording setup, a shot taken just after I finished recording the above video:

You can see that I have built a mini-recording set in my front hallway. All that matters is what’s on camera, so the wood panel background is actually just a prop I have leaning against the wall.
And for lights, I bought a set of three lights from Amazon for under $100 and place them approximately on the 30-degree marks from me, and a third I use as what’s called a “hair” light, illuminating behind me and lighting up the very edge of the back of my head. Particularly when against a background that’s a similar color to your hair, this can be a really important light.
There’s more to talk about, including camera options (don’t forget your late model Canon or Nikon DSLR can also double as a high-quality HD video camera, for example) and basics of editing, along with what to do once you’ve finished your video, but we’ll get to those topics soon!
Tyler is an award-winning digital marketer, founder of Pubtelligence, CMO of Ezoic, SEO speaker, successful start-up founder, and well-known publishing industry personality.
Featured Content
Checkout this popular and trending content

Ranking In Universal Search Results: Video Is The Secret
See how Flickify can become the ultimate SEO hack for sites missing out on rankings because of a lack of video.
Announcement
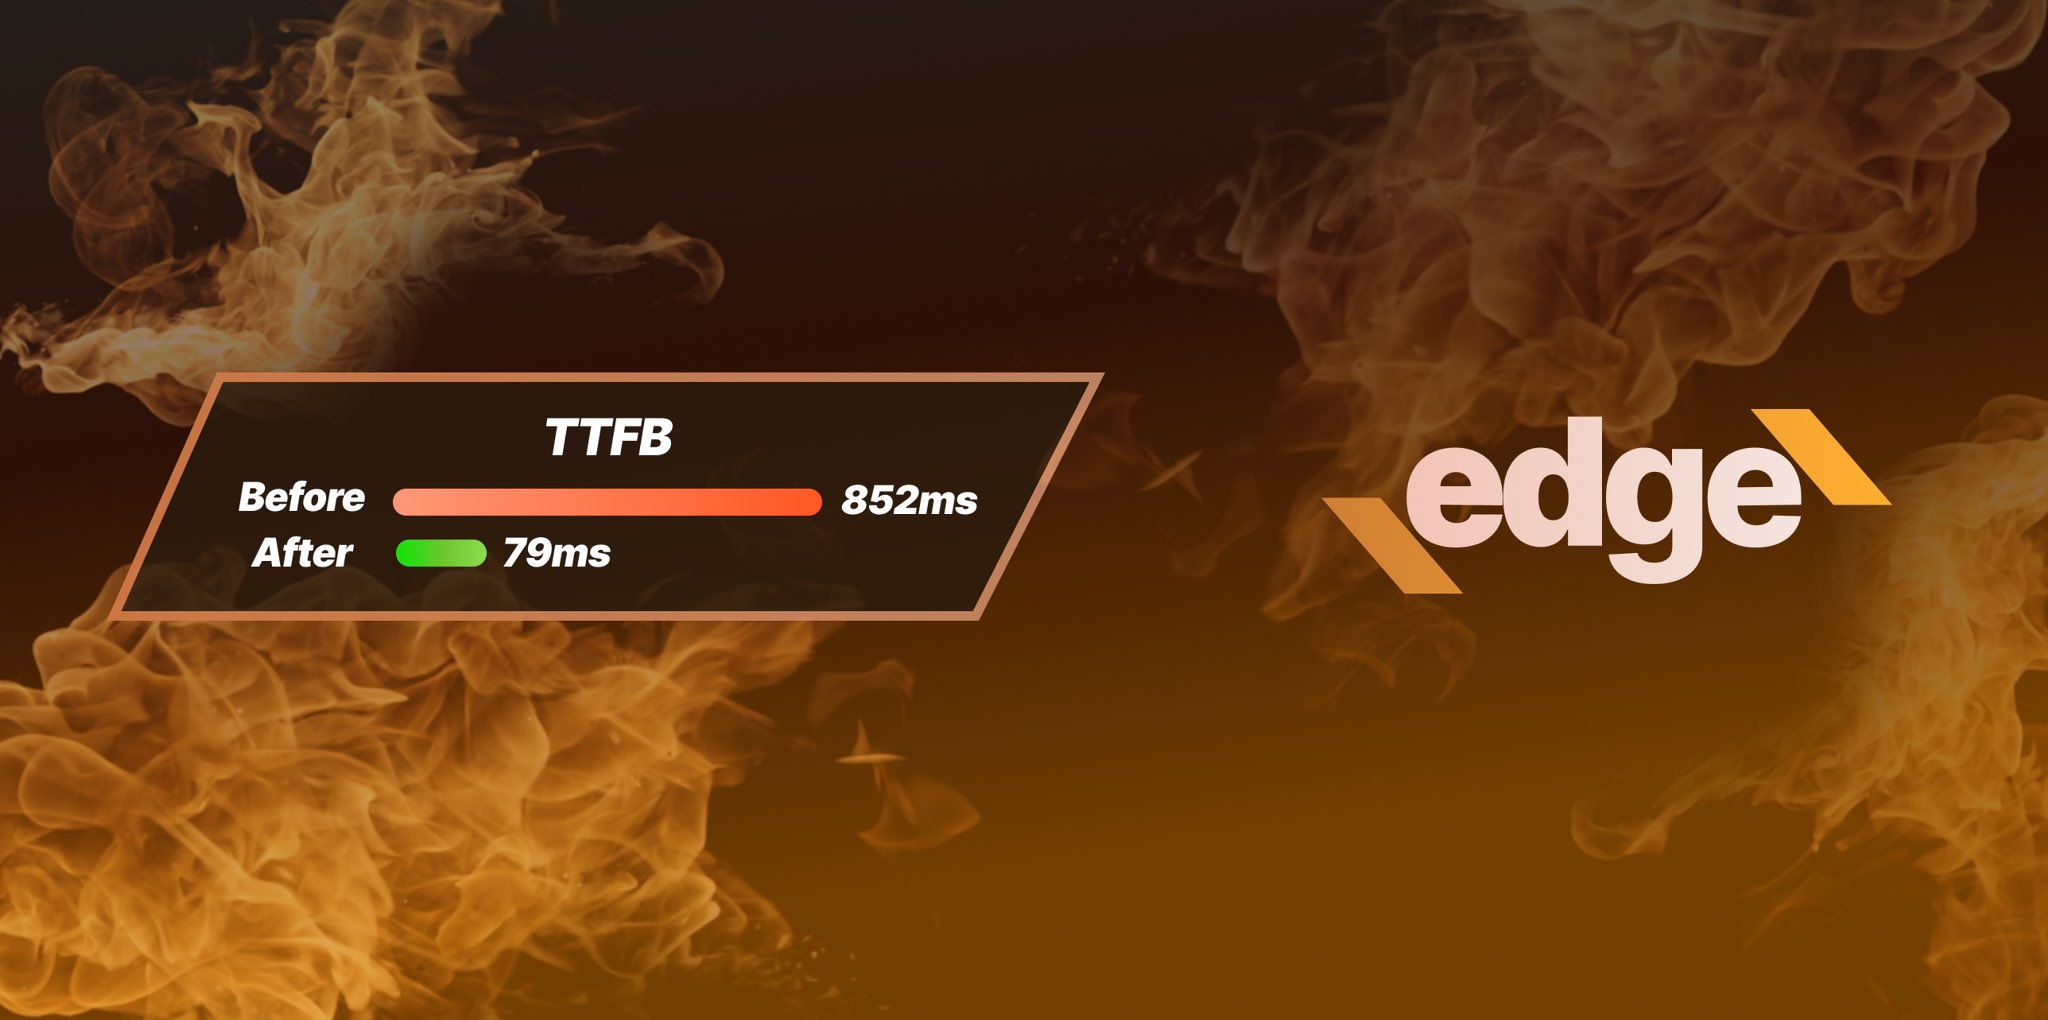
Ezoic Edge: The Fastest Way To Load Pages. Period.
Ezoic announces an industry-first edge content delivery network for websites and creators; bringing the fastest pages on the web to Ezoic publishers.
Launch
Ezoic Unveils New Enterprise Program: Empowering Creators to Scale and Succeed
Ezoic recently announced a higher level designed for publishers that have reached that ultimate stage of growth. See what it means for Ezoic users.
Announcement
